Drip Tape: ONE STOP SOLUTION- Water Saving, High Yield Farming 2025
Drip tape irrigation is a game changer for farmers and gardeners alike, especially when it comes to conserving water and maximizing harvests. Whether you’re new to smart farming or looking to optimize your existing irrigation system, this guide will walk you through using drip tape irrigation like a pro.
What is Drip Tape Irrigation?
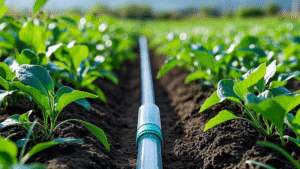
Drip tape irrigation is a type of micro-irrigation system that delivers water directly to the roots of plants. This method minimizes water waste, reduces evaporation, and ensures that your crops receive the precise amount of moisture they need to thrive.
Why Choose Drip Tape?
Drip tape is favored for its efficiency and effectiveness. Unlike traditional irrigation methods that water from above, drip tape releases water slowly at the base of plants. This targeted approach leads to better water conservation and healthier plants. Here’s why you should consider it:
- Water Conservation: Drip irrigation systems use up to 50% less water compared to conventional methods.
- Increased Yield: By providing water directly to the roots, plants receive consistent moisture, resulting in higher yields.
- Reduced Weed Growth: Since water is delivered directly to the plant, weed growth is minimized.
Setting Up Your Drip Tape Irrigation System
Setting up a drip tape irrigation system might seem daunting, but it’s actually quite straightforward. Here’s a step-by-step guide to get you started.
Step 1: Plan Your Layout
Before you head to the drip tape factory or purchase supplies, plan your irrigation layout. Consider the following:
- Crop Type and Spacing: Different crops require different spacing and water needs.
- Field Size: Measure your field to determine how much drip tape and tubing you’ll need.
- Water Source: Identify the most efficient water source for your system.
Step 2: Gather Your Supplies
You’ll need the following materials to set up your system:
- Drip Tape: Choose a tape with the appropriate thickness and emitter spacing for your crops.
- Mainline Tubing: This connects your water source to the drip tape.
- Filters and Pressure Regulators: Ensure clean water and optimal pressure for your system.
- Fittings and Connectors: These join the mainline tubing and drip tape.
Step 3: Install the Mainline Tubing
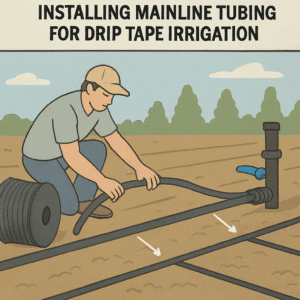
Lay out your mainline tubing along the rows you plan to irrigate. Secure it in place with stakes or clips to prevent movement. Connect the tubing to your water source and attach filters and pressure regulators as needed.
Step 4: Connect the Drip Tape
Attach the drip tape to the mainline tubing using connectors. Ensure the tape is laid flat and straight, and use stakes to hold it in place. Be mindful of the emitter spacing to provide even water distribution.
Step 5: Test Your System
Before planting, test your irrigation system to check for leaks or clogs. Turn on the water source and ensure that each emitter is releasing water evenly. Adjust as necessary to achieve optimal performance.
Optimizing Your Drip Tape Irrigation
Once your system is set up, it’s important to optimize its use for maximum efficiency.
Monitor and Adjust
Regularly check your irrigation system for any issues. Look for leaks, clogs, or uneven water distribution. Adjust the pressure or replace damaged components as needed to ensure consistent water flow.
Schedule Watering Times
The timing of irrigation is crucial for crop success. Schedule watering times based on your plants’ needs and environmental factors. Early morning or late afternoon is ideal to minimize evaporation.
Incorporate Smart Farming Techniques

by Wolfgang Weiser (https://unsplash.com/@hamburgmeinefreundin)
Consider integrating smart farming technology into your drip irrigation system. Sensors and automated controllers can help monitor soil moisture levels and adjust watering schedules, ensuring your plants receive the optimal amount of water.
Benefits of Drip Tape Irrigation
Drip tape irrigation offers several benefits that make it an attractive option for farmers and gardeners:
- Water Efficiency: As water becomes an increasingly scarce resource, saving water is more important than ever. Drip tape irrigation maximizes water use, reducing waste and promoting sustainability.
- Improved Crop Quality: Consistent moisture levels lead to healthier plants and higher-quality harvests.
- Cost Effectiveness: While the initial setup cost may be higher than traditional methods, drip irrigation systems save money in the long run through reduced water usage and increased yields.
Conclusion
Drip tape irrigation is a smart choice for those looking to conserve water, improve crop yields, and practice sustainable farming. By following the steps outlined in this guide, you’ll be well on your way to using drip tape irrigation like a pro. With careful planning, regular maintenance, and the integration of smart farming techniques, you can optimize your irrigation system and enjoy the benefits for years to come.
Whether you’re an experienced farmer or a novice gardener, drip tape irrigation can make a significant difference in your harvest and contribute to water conservation efforts. So why wait? Start planning your drip tape irrigation system today and see the positive impact it can have on your farming operations.
Written by

Hai Shun
You may also interested in:
Drip Irrigation Tape : How It Saves 40% Water & Boosts Crop Yield 25% (2025 Agritech Harvest Guide)
Drip Irrigation Tape: Harvest ,Save Water and Increase Yield | Haishun Learn how modern Drip Irrigation Tape works, understand its advantages over flood irrigation, and explore how to choose the