
Installation Guide: How to Set Up a Smart Fertigation System
Target keyword: smart fertigation system installation ·
Short Excerpt
This smart fertigation system installation guide walks you through site preparation, hydraulic and electrical layout, sensor placement, controller commissioning, and final training. Use it as a checklist to reduce installation errors, stabilize crop yields, and secure a reliable return on investment.
Introduction & Background
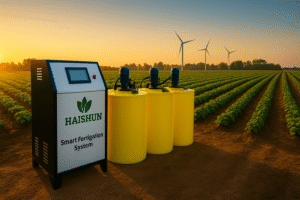
Smart fertigation systems
deliver water and nutrients precisely and automatically, improving efficiency, reducing waste, and stabilizing yields.
For installers, mastering smart fertigation system installation ensures fast commissioning, stable performance, and fewer callbacks from growers.
| Aspect | Traditional Irrigation | Smart Fertigation |
|---|---|---|
| Water usage | High & inefficient | Optimized, needs-based |
| Nutrient delivery | Manual & inconsistent | Automated & precise |
| Labor costs | High | Lower |
| Yields | Variable | Higher, more consistent |
| Data & control | Limited | Comprehensive, remote dashboards |
Precision irrigation and fertigation adoption is rising globally. For agronomic principles and water-use stewardship, see FAO guidance (FAO).
Core Functions During Installation
- Precise nutrient delivery: injector or pump sizing, recipe mixing, EC/pH stabilization.
- Automated scheduling: irrigation by soil moisture, climate, and crop stage.
- Real-time monitoring: sensor placement, calibration, and controller pairing.
- Data logging & analysis: track EC, pH, flow, temperature, and moisture for optimization.
- Alarms & notifications: thresholds, leak/pressure drops, and pump dry-run protection.
Key Selection Considerations
- Scale: zones, simultaneous flows, and head loss across mainlines.
- Crop type: EC/pH windows and phenology-based scheduling.
- Water source & quality: filtration (disc/sand), salinity, bicarbonates, pathogens.
- Power availability: AC vs. solar kits, surge protection, and grounding.
- Connectivity: Wi-Fi/LTE gateways and data plans for remote control.
- Budget vs. ROI: target 12–18 month payback via water and fertilizer savings, plus yield gains.
- Ease of installation & service: modular manifolds, quick unions, and labeled wiring.
For choosing system models, see How to Choose the Right Fertigation System.
Smart Fertigation Installation – Step-by-Step
- Step 1:
Site preparation & layout.
Confirm pump room space, drainage, safe chemical storage, and controller mounting height. - Step 2:
Hydraulic assembly.
Place tanks, injectors or venturi units, backflow preventer, filters, flowmeter, and pressure gauges; follow arrow flow directions. - Step 3:
Electrical & control wiring.
Use a dedicated breaker, proper earthing, cable trays, and clearly labeled terminals for valves, pumps, and sensors. - Step 4:
Sensor installation.
Install soil moisture, EC/pH, temperature, and pressure sensors at recommended depths and velocities. - Step 5:
Controller commissioning.
Pair devices, set zones, enter crop programs, and configure irrigation schedules for the
smart fertigation system installation. - Step 6:
Recipe & calibration.
Calibrate EC/pH, validate injector flow at different setpoints, run a water-only test, then a low-dose nutrient test. - Step 7:
Alarms & safety.
Set EC, pH, and pressure thresholds; enable leak detection, dry-run protection, tank level alarms, and SMS/email notifications. - Step 8:
Pilot run & training.
Run 1–2 days of supervised operation; document SOPs, handover checklists, and maintenance intervals.
HPMC in Fertigation Solutions (If Applicable)
HPMC (Hydroxypropyl Methylcellulose) is not part of mechanical installation, but it may be used in
liquid fertilizer formulation where viscosity or suspension stability is required.
Always verify pump and injector compatibility with higher-viscosity inputs.
| Feature | Benefit | Fertigation use |
|---|---|---|
| Thickening | Prevents settling | Suspending micronutrients |
| Stabilization | Uniform concentration | Even nutrient distribution |
| Film-forming | Leaf adherence (foliar) | Relevant for foliar lines |
Common Issues & Fixes
Connectivity
Weak Wi-Fi or LTE: add an external antenna or signal booster, place the gateway higher, and verify APN settings.
Sensor calibration
Use certified buffers (pH 4/7) and EC standards; use temperature-compensated probes; re-calibrate monthly.
Leaks & priming
Apply PTFE tape and torque per spec; prime pumps per manual; check O-rings and unions for damage.
Software pairing
Update firmware, reset and re-pair devices, and verify timezones and NTP settings for accurate logs.
Power quality
Install SPD surge protection, separate power and signal conduits, and ensure proper grounding.
Water quality
Mitigate clogging risks with pre-filtration, periodic chemical cleaning, and ΔP monitoring across filters.
Next steps after go-live: set maintenance intervals from
Fertigation System Maintenance.
Why Choose Haishun
- Modular design: fast smart fertigation system installation and future upgrades.
- Accurate sensors: EC/pH/moisture suites with temperature compensation.
- Intelligent control: user-friendly UI, OTA updates, and cloud dashboards.
- Remote access: Wi-Fi/LTE connectivity for alerts and remote commands.
- Durable components: corrosion-resistant manifolds and industrial-grade valves.
Ready to plan your project with Haishun?
Request a free quote
Book a live demo
Looking for a complete smart fertigation solution, from water treatment to irrigation lines and sensors?
Visit Haishun or contact us via email to discuss your farm layout and ROI targets.
Frequently Asked Questions
How long does installation take?
Small farms typically need 1–2 days. Multi-zone greenhouses usually require 3–5 days, including training and pilot operation.
Can I use solar power?
Yes. Ensure inverter sizing for pump inrush currents and continuous controller loads, plus proper surge protection.
What’s the minimum sensor set?
At minimum, install soil moisture, EC, pH, and pressure sensors at the manifold in/out to support diagnostics and optimization.
Do I need a water test?
A water test is strongly recommended before commissioning to define filtration, scaling risk, and recipe buffering strategies.
How do I keep injectors accurate over time?
Calibrate monthly, inspect seals, clean strainers, and verify delivered volumes with graduated cylinders at several flow rates.